I have been running a homelab for a while now, and this post documents the full process of getting Proxmox VE up and running as the virtualization foundation. This is Part 1 of my "Homelab" series. Let's get the hypervisor sorted first.
Why Proxmox VE
Before committing to a platform, I evaluated ESXi, Unraid, and TrueNAS Scale. Proxmox VE (PVE) won for a few straightforward reasons:
- Free and open-source: Built on Debian. No feature gating; the paid subscription only adds tech support.
- KVM + LXC: Run full virtual machines (KVM) for heavy workloads and lightweight containers (LXC) for services that don't need a full OS. Best of both worlds.
- Solid Web UI: Manage everything from a browser. No thick client needed.
- Active community: The forums and wiki are genuinely helpful. Most problems have already been solved by someone.
Especially after Broadcom's acquisition of VMware made ESXi's free tier future uncertain, PVE has become the default choice in the homelab community.
Installing PVE
What You Need
- Download the latest PVE ISO from the official site
- Flash it to a USB drive with Rufus (Windows) or balenaEtcher (macOS/Linux)
- Make sure VT-x / VT-d is enabled in your target machine's BIOS
Installation Walkthrough
Plug in the USB drive, boot from it, and follow the installer. The key steps:
- Select target disk: Pick the drive you want PVE on. SSD or NVMe recommended.
- Country and timezone: Set to your region.
- Root password and email: Remember the root password. The email can be anything.
- Network configuration: This is the important one. Plug in an Ethernet cable and let it auto-detect an IP address. Write it down (mine was
192.168.2.217). You'll need this to access the Web UI.
Once the installation finishes, you can disconnect the monitor. Everything from here on is done through the Web UI or SSH.
Accessing the Web UI
From another device on the same network, open a browser and go to:
https://192.168.2.217:8006/
A few things to note:
- It's https, not http
- Your browser will warn about an invalid HTTPS certificate. This is expected, just proceed
- Username is
root, password is what you set during install
After logging in, you'll see the PVE management dashboard:
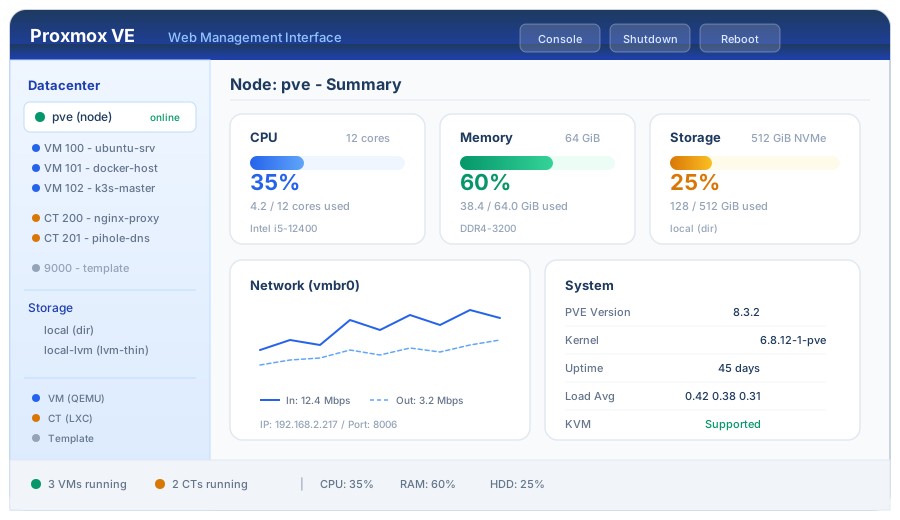
The left panel shows a tree of your datacenter, nodes, VMs, containers, and storage. The right panel shows details for whatever you have selected: CPU, memory, storage usage, and system information.
Basic Configuration
A few things to configure right after installation to avoid headaches later.
1. Disable the Enterprise Repository
PVE ships with the enterprise repository enabled by default. Without a subscription, apt update will throw errors.
Navigate to: Datacenter -> pve -> Updates -> Repositories
Find the entries with Proxmox enterprise origins (usually the last two) and click Disable. Then click Add and select the No-Subscription repository.
2. Set Up Package Mirrors (Optional)
If you're in a region where the default Debian mirrors are slow, switch to a closer mirror. Here's an example using USTC mirrors (useful for users in China):
# Backup original sources
mkdir -p /etc/apt/sources_backup
cp /etc/apt/sources.list /etc/apt/sources_backup/sources.list.bak
cp /etc/apt/sources.list.d/ceph.list /etc/apt/sources_backup/ceph.list.bak
cp /etc/apt/sources.list.d/pve-enterprise.list /etc/apt/sources_backup/pve-enterprise.list.bak

# Replace Debian sources with USTC mirror
sed -i 's|^deb http://ftp.debian.org|deb https://mirrors.ustc.edu.cn|g' /etc/apt/sources.list
sed -i 's|^deb http://security.debian.org|deb https://mirrors.ustc.edu.cn/debian-security|g' /etc/apt/sources.list

# Replace Ceph source
echo "deb https://mirrors.ustc.edu.cn/proxmox/debian/ceph-quincy bookworm no-subscription" > /etc/apt/sources.list.d/ceph.list

# Update package index
apt update -y
For other regions, just swap in your preferred Debian mirror.
3. Configure Storage Content Types
By default, the local storage only accepts ISO images and backups. To store VM disks and other content types:
Navigate to: Datacenter -> Storage -> local -> Edit
Check all content types under the Content dropdown (Disk image, ISO image, Container template, Snippets, VZDump backup file, etc.).
4. Merge Disk Partitions (Recommended for Single-Disk Setups)
PVE's installer creates two logical volumes by default: pve-root (system, ext4) and pve-data (VM storage, lvm-thin). For a single-node homelab, this split wastes space. Merging them gives you one big partition:
# Check current disk usage
df -h

# View logical volumes
lvdisplay

# Unmount and remove the data volume
umount /dev/pve/data
lvremove /dev/pve/data

# Expand root to use all free space
lvresize -l +100%FREE /dev/pve/root

# Resize the filesystem
resize2fs /dev/mapper/pve-root
Verify the result:
df -h
# Should show something like:
# /dev/mapper/pve-root  450G  2.5G  428G   1% /
Your entire disk is now available under the root partition.
Important: After removing
pve-data, go to Datacenter -> Storage in the Web UI and delete thelocal-lvmentry. Keep onlylocal.
5. Install Essential Tools
apt update -y

# CPU frequency and temperature monitoring
apt install linux-cpupower -y
modprobe msr
echo msr > /etc/modules-load.d/turbostat-msr.conf
chmod +s /usr/sbin/turbostat

# QEMU Guest Agent (lets the host properly manage VMs)
apt install qemu-guest-agent -y

# fail2ban (protect SSH from brute-force attacks)
apt install fail2ban -y
There are also community scripts that add CPU temperature and frequency readouts directly to PVE's Summary page, if you want that level of monitoring at a glance.
Creating a Cloud-Init Template
Installing from an ISO every time you need a new VM is tedious. PVE supports Cloud-Init, the same mechanism used by AWS, GCP, and other cloud providers, to auto-configure VMs on first boot.
What Cloud-Init Does
When a VM boots for the first time with Cloud-Init, it automatically:
- Configures hostname and networking (IP, DNS, gateway)
- Injects SSH public keys
- Creates user accounts and sets passwords
- Expands the filesystem to fill the disk
PVE has native Cloud-Init support, but you need a Cloud Image (not a regular ISO installer).
Building an Ubuntu Cloud-Init Template
Using Ubuntu 24.04 LTS as an example:
# 1. Download the Ubuntu Cloud Image
wget https://cloud-images.ubuntu.com/releases/24.04/release/ubuntu-24.04-server-cloudimg-amd64.img

# 2. Create a new VM (ID 9000, reserved for templates)
qm create 9000 --name ubuntu-noble-template --memory 2048 --net0 virtio,bridge=vmbr0

# 3. Import the downloaded image as a VM disk
qm importdisk 9000 ubuntu-24.04-server-cloudimg-amd64.img local

# 4. Attach the imported disk via SCSI
qm set 9000 --scsihw virtio-scsi-pci --scsi0 local:9000/vm-9000-disk-0.raw

# 5. Resize the disk from 2GB to 50GB
qm resize 9000 scsi0 50G

# 6. Add a Cloud-Init CD-ROM drive
qm set 9000 --ide2 local:cloudinit
Configure and Convert to Template
After running the commands above, finish the setup in the Web UI:
- Set boot order: Hardware -> Boot Order. Make sure
scsi0is enabled and listed. - Configure Cloud-Init: In the Cloud-Init panel, set:
- User: Your username
- Password: A login password
- SSH public key: Your public key (Cloud Images disable password-based SSH by default, so this is mandatory)
- IP Config: DHCP or a static IP
- Click "Regenerate Image" to apply the configuration.
- Boot the VM and test: SSH in and verify everything works.
- Install base packages:
sudo apt update -y
sudo apt install neovim vim git qemu-guest-agent curl wget openssh-server -y
- Confirm QEMU Guest Agent is running:
sudo systemctl status qemu-guest-agent
# If not installed:
sudo apt install qemu-guest-agent -y
- Install any additional tools you want in every VM (Docker, Python, etc.)
- Shut down the VM, then right-click -> Convert to Template
Cloning VMs from the Template
With the template ready, creating a new VM is trivial:
- Right-click the template -> Clone
- Choose Full Clone
- Adjust Cloud-Init parameters (IP, hostname, etc.)
- Start it up. You'll have a fully configured VM in minutes